Tutorial: AI in the Scientific Research Workflow (2026)
For students & early-career researchers · AI · LLMs
This tutorial is a written version of the conversations I keep having with students and early-career researchers about using AI tools in the scientific research workflow.
Students often ask me where to start learning AI, which is a great question! Most of the content I could point them to is either biased toward a specific AI company or not designed for research workflows. So I compiled this tutorial to help students and fellow researchers make informed decisions about using AI in their work.
Contents
1. How to think about working with AI
This tutorial positions AI as a research assistant working closely under your command. Used naively, AI introduces real risk: science demands a far higher bar for correctness than casual AI use. The rest of this tutorial helps you setup a reusable system that follows the core principles of a reliable AI research workflow:
- Factuality: ground all AI output in real sources.
- Traceability: make every claim trace back to a source you can open and verify. This in turn supports factuality.
- Integrability: connect the AI to the tools you already use.
- Reproducibility: push your work out of ephemeral chat interfaces and into files (data, scripts, and instruction files) that you can re-run, version-control, and share.
That said, none of this guarantees the AI strictly follows these principles. It is ultimately your responsibility, as the human user, to verify any AI output before you use it.
2. My recommended toolkit for 2026
I've packaged everything into a template repository on GitHub to make it easy for you to get started. Step 6 will show you how to set it up.
How the rest of this tutorial is structured
Each step has two parts. A short overview in the main text covers the what and why. An expandable Step-by-step block follows with detailed instructions — the how. If you're following along at your keyboard, click any ▸ Step-by-step heading to expand it.
The tutorial starts with the basics for beginners and then ramps up pretty quickly to a full worked example with some advanced concepts, so feel free to skim through parts you already know.
3. Set up an IDE
An IDE (Integrated Development Environment) is a program for writing and running code. I recommend working with AI inside an IDE, even if you never intend to write or read a line of code yourself. For research, an IDE gives you things an AI chat app can't:
- You stay in control of the system. Your data, scripts, and results are all visible in a file panel. Nothing is hidden inside a chat app.
- AI works in real files, not disposable messages. You can have AI write an executable analysis script, save a cleaned data file, or add a results table directly to your project. These are artifacts you can inspect and re-run (Principle 4: Reproducibility).
- You get the same AI models you already use. The IDE extensions connect to the exact same models you already use. You're not downgrading the AI, but just upgrading the environment around it.
So, which IDE should you use? I recommend Visual Studio Code ("VS Code"). It is free, it runs on Windows, Mac, and Linux, and every major AI model has an extension for it.
Step-by-step: install VS Code
- Download and install VS Code from code.visualstudio.com.
-
Outside VS Code, use your computer's File Explorer (Windows) or Finder (Mac) to create a new folder for your project. You can name it anything you like (for example,
AI Research Project). - Now switch to VS Code. Open it, then select File → Open Folder and choose the folder you just created. From this point on, everything you do for this project will live inside that folder.
- Take a quick look around the interface. The Explorer panel on the left (the icon of two stacked pages) shows the files in your project folder. The Extensions panel (the icon of four squares) is where you'll install the AI agent in Step 4.
4. Choose your AI agent
You can think of the AI agent as the assistant who works in the IDE with you. Before picking one, let's understand what an agent actually is.
As a computer scientist I think of an agent as a machine learning model (specifically, a large language model, or LLM for short) wrapped in a loop. The agent loop is an algorithm that follows a standard pattern: read → decide → act → observe. Let's illustrate this idea in pseudocode — a human-readable description of an algorithm:
while not done():
    state = read()
    decision = decide(state)
    result = act(decision)
    observe(result)
And here's the same idea in plain language:
The agent loop
- Read: "What is the current situation?" Gather all relevant information (e.g., read your files).
- Decide: "Given what I know, what should I do next?" Figure out what to change and how.
- Act: Carry out the chosen action (edit code, run commands, etc.).
- Observe: "What changed? Did it work? What did I learn from the result?"
- Repeat from Step 1 until the goal is achieved.
Today, agents typically let you switch between a few modes:
Ask
The agent answers questions and explains things but doesn't edit your files.
Plan
The agent writes out a step-by-step plan before doing anything, so you can review and approve the approach first.
Agent
The agent edits files and runs code, usually pausing to ask permission before making changes to your files (such as editing, deleting, or overwriting them). A safe way to start is to use Plan mode first, then switch to Agent mode once you're happy with the plan.
The agent harness versus the model
We can also describe an agent using a simple mental model: agent = harness + model.
Harness
The software
Runs the agent loop and performs actions — reading files, running commands, feeding results back in.
Model
The LLM
Receives information from the harness and generates the outputs — the plans and decisions.
read → decide → act → observe ↺
Understanding this distinction matters because effective use of AI requires choosing both. An excellent model can prove useless inside a poor harness, while a simpler, cheaper model paired with a good harness may perform surprisingly well. To help you think about the distinction when using these systems, ask yourself which part is the real bottleneck — the reasoning of the model, or the scaffolding around it?
Which agent harness should you choose?
Pick a harness that installs directly inside VS Code. Two popular options today are GitHub Copilot and Claude Code. Start by checking what your university or workplace may already provide. GitHub Copilot is a reasonable default and comes with a free tier, so that's what we'll use in this tutorial.
Step-by-step: install and set up your agent
The steps below use GitHub Copilot as the agent harness.
- In VS Code, open the Extensions panel (the four-squares icon on the left bar).
- Search for
GitHub Copilotand click Install. (It may be listed under a different name like GitHub Copilot Chat and may already come preinstalled.) - When prompted, click Sign in and authorise with your GitHub account in the browser window that opens. If you're a verified student, make sure your GitHub Education benefits are active first so Copilot is enabled on your account.
- Open the Copilot Chat panel: click the chat icon in the top title bar, or press
Ctrl + Alt + I(Windows/Linux) /Cmd + Ctrl + I(Mac). - At the bottom of the chat box, use the dropdown to switch between Copilot's modes. Start in Ask to get a feel for it, and switch to Agent when you want it to create and run files.
5. Choose your LLM model
Which model should I use to power my agent?
The best practice here is to choose the right model for the right task. Models come from several providers, but the more useful distinction is that each provider offers a tier of models. I personally use a two tier mental model to help me decide:
Fast default tier
everyday · lower costFaster and cheaper, and handles most everyday tasks well. Make this your default and only escalate when it falls short.
Highly capable tier
deeper reasoning · higher costAccepts longer context and reasons more deeply, for better planning on hard problems. Reach for it when a task needs deeper reasoning or a larger context window (amount of text it can process).
I recommend experimenting with different providers to see which ones you like working with, and settling on two for your everyday work: a fast default and one highly capable model.
The model is where the cost is incurred
Recall the mental model from Step 4: agent = harness + model. The harness is usually a fixed subscription, but the model is metered. Every request you send is priced by the number of tokens (roughly, pieces of words) it reads and generates, so the fancier models cost several times more per request than the cheaper ones. This is the main running cost of working with AI, and it is the one you control directly.
Step-by-step: switch models and compare
The steps below use GitHub Copilot, where the model is billed through your Copilot subscription.
- Open the Copilot Chat panel and find the model dropdown at the bottom of the chat box.
- Select a fast, cheaper model (for example, a Sonnet- or Flash-tier model) and run your prompt.
- Read the result. If it answers your question well, stop here — you've done the task at the lower cost.
- If the output falls short, select a more capable model from the same dropdown and re-run the same prompt, unchanged. This isolates the model as the only variable, so you can see what the extra capability buys you.
- Compare the two answers. Over time this builds your own intuition for which tasks genuinely need the capable tier and which run fine on the cheaper default.
Note as of mid-2026: The free version of GitHub Copilot in VS Code only provides an Auto mode, so you cannot manually choose which AI model to use.
If you want to compare different models without upgrading to a paid tier of GitHub Copilot, you can add your own model provider instead. In the model selection menu, click Settings (next to Other models) → Add models → OpenRouter.
OpenRouter lets you pay only for what you use. You can add a small amount of credits (a couple of dollars is more than enough to cover this tutorial) to cap your spending while gaining access to hundreds of models from different providers. This includes inexpensive frontier models from Chinese AI labs (e.g., DeepSeek V4 Flash, DeepSeek V4 Pro, and Kimi K3).
Before you send research data
Anything you send to a model leaves your machine and is processed by that provider. Check the provider's policies before sending sensitive data to any third-party model.
6. Setup your workspace like a scientist
A clear directory structure keeps your work reproducible and makes it obvious where everything lives (Principle 4: Reproducibility). It also gives the AI a clean map of your project, so the agent behaves more predictably and is easier to steer.
The good news is that I've already set this up as a template! You just need to pull it into your VS Code workspace.
In this step we'll get the template setup on your computer. In the steps that follow we'll walk through what it contains and how to use it.
Step-by-step: get the template into your workspace
First, decide where your project will live. I recommend a folder inside a location on your computer that is backed up to the cloud — for example a Google Drive, OneDrive, or Dropbox folder that syncs from your machine. This gives you automatic backups for research work you can't afford to lose.
A note on version control
Experienced developers usually track changes with git. Learning git is out of scope for this tutorial. If you already know git and prefer it, of course feel free to use it.
- In your cloud-backed location, create a new folder for your project (for example,
my-research-project). - Open the template repository on GitHub in your browser.
- Click the green Code button, then Download ZIP. This downloads the whole template as a single zip file — no git required.
- Unzip the file, and move the contents into the project folder you created in step 1.
- In VS Code, choose File → Open Folder and select that project folder. The template's files now appear in the Explorer panel, and your agent can see them too.
7. Learn the core AI concepts
If there's one thing I want you to take away from this tutorial, it's the concepts in this section. At the time of writing (mid-2026), these are emerging as standard conventions for working with AI. Later in Step 8, you'll apply these concepts to a real research workflow.
Markdown: the plain-text format AI reads and writes
You'll notice many files in the template end in .md. These are Markdown files, a simple way of writing formatted text: # for a heading, **bold** for bold, - for a bullet point, and so on. Markdown is readable as plain text, and AI models read and write it fluently, which is why it's become sort of a default format for working with AI.
Some types of Markdown files are long-standing conventions from software development. The README.md file is the classic example: by universal convention, it is the front page of a project that tells anyone who opens it what the project is and how to use it. Other Markdown files we'll see in the template are newer conventions emerging in the AI community.
README.md
The project's front page: what it is and how to use it.
AGENTS.md
Your project context and working preferences, for the agent to read.
SKILL.md
Describes one capability the agent can invoke.
Step-by-step: read and preview a Markdown file
- In the Explorer panel, double-click
README.mdto open it. Scroll through the raw text and notice the#headings,**bold**markers, and-bullets — this is what Markdown looks like before it renders. - Right-click the same
README.mdfile in the Explorer panel and select Open Preview — or, with the file open, pressCtrl+Shift+V(Cmd+Shift+Von Mac). A formatted view opens beside the raw text. Compare the two: the underlying syntax disappears and what remains is clean, structured formatting.
Instruction files: telling the AI how you work
Instead of re-explaining your project and your preferences at the start of every conversation, you can write instruction files that the agent reads automatically. The common convention is AGENTS.md, a Markdown file that most agents understand to hold your project's context and your working preferences.
For example, an AGENTS.md for a biology project might tell the agent which organism and assay you work with, which reference genome build to assume (e.g. GRCh38), your statistical conventions, that data/raw/ is read-only, and that you prefer R for statistics but Python for general scripting.
Step-by-step: explore the AGENTS.md file
- In the Explorer panel, double-click
AGENTS.mdto open it and read through the file. Pay particular attention to## Conventionsand## Working preferences. The agent treats these as hard rules, not preferences. These rules also map directly to the four principles from Step 1. - Close the file and consider what you would put in your own
AGENTS.md. A well-written file means you define your rules once and the agent applies them consistently.
Tools and skills: connecting AI to the tools you already use
By default, an LLM answers from its training data alone. For a scientist, this is dangerous: a model can hallucinate a citation or misrepresent a technical concept. Tool calling addresses this. It connects the model to the systems you already use (literature search engines, databases, etc.), so the model retrieves real information.
We won't cover it in this tutorial, but one tool calling approach you may encounter is MCP (Model Context Protocol). When connected to an MCP server, the agent discovers and calls available tools automatically.
This tutorial uses the skills approach. A SKILL.md file describes a capability to the model, typically alongside scripts that implement it. Google DeepMind has created a collection of agent skills designed for scientific research tasks. These are already integrated into the template and ready to use.
MCP
Connects to an external server; the agent discovers and calls its tools automatically.
SKILL.md
Describes one capability to the agent, alongside the details for how to implement it.
Step-by-step: explore the science skills
- In the Explorer panel, open the
skills/science/directory. Each subfolder is a separate skill, named after the tool or database it connects to. - Scroll through the folder names and see what you recognise as resources you already use. For example,
ensembl_database,literature_search_biorxiv, andpubmed_databasemay sound familiar. - Open any skill folder and note the structure: a
SKILL.mdfile describes the skill to the agent, and thescripts/directory contains the code the agent runs when it invokes the skill. - Open
SKILL.mdand read the YAML block at the top. Thedescriptionfield is written for the agent, not the reader — it tells the model when to use this skill rather than another.
Information management: memory for your agent
How agents handle memory is still an evolving area. The underlying LLM model is limited by its context window, the amount of text it can process at once. Within that limit, the model can only reason over what is currently visible to it.
An agent harness therefore needs a persistence layer outside the model itself. This layer selects, stores, and retrieves information during and across conversations and workflows. In practice, you build this layer from files and databases. For example, the agent might append progress updates to a markdown file, or maintain a database of experiment runs.
Files
markdown · CSV · JSONPlain text files (.md, .csv, .json, etc.) that the agent reads and writes directly. They are easy to inspect and edit yourself, making them ideal for notes, small datasets, and structured records that fit in a single file.
Database
SQLiteA database stores the same kind of information as files, but is designed for larger collections of data. It lets the agent quickly search, filter, and connect records without reading every file from start to finish.
Step-by-step: explore information management in the template
For this tutorial, we'll only work with files. The example project is small enough that it doesn't need a database. Let's look at two file formats used in the template:
- Open
example/data/raw/airway_metadata.csv. It's a plain CSV, one row per sample. - Open
example/data/literature/sources_claude.json. Also a file, but structured as JSON rather than rows and columns.
Files vs databases: what's the difference?
A CSV file is just a table saved as a file. You typically open the whole file, read or write it, then save it again. This works well for small datasets, logs, and simple records.
A database (such as SQLite) also stores tables in a file, but lets you retrieve only the records you need. For example, instead of loading every experiment, you can ask for "all experiment runs from last week" or "every sample from patient 42". This is much more efficient for large datasets and since you pay for the amount of text (called tokens) sent to and from the AI model, retrieving only the relevant records can greatly reduce your costs.
If you want to learn more about this topic, the Data Carpentry lesson on working with SQLite gives a gentle introduction aimed at researchers and explains why you might choose a database over CSV files.
8. Putting it all together: a complete workflow
It's time to bring everything together on a real analysis. In this worked example we'll do a differential expression analysis of RNA-Seq data, driving each step through your AI agent.
RNA-Seq measures the abundance of RNA transcripts for each gene in a sample, giving a snapshot of which genes are "turned on" and how strongly. Differential expression analysis compares those gene expression levels across different experimental conditions, groups, or other variables to identify genes whose activity significantly changes between them. These comparisons can involve two or more conditions, such as drug-treated versus untreated samples, different drug concentrations, developmental stages, tissues, organisms, or species.
This is not a bioinformatics tutorial
The focus here is learning AI, not bioinformatics, and the example assumes no familiarity with the field. I've deliberately kept the analysis simple: it runs on one machine, omits data pre-processing details, and uses Python only — no R or other languages. It doesn't use pipeline orchestration tools (such as Snakemake or Nextflow) or distributed computing across a HPC cluster. All of that is out of scope here, though you could extend the template to handle it if you need to.
The full walkthrough lives in the template at docs/worked-example.md. It's a document you read and follow, not a skill — the agent isn't invoking a capability here, you're steering it through an analysis step by step.
Setup
Switch to Agent mode for this worked example, so the agent can read files and run commands for you. The first thing we'll do is run a skill that sets up the project: it installs the software dependencies the analysis needs (Python, the analysis libraries, and the tooling for the science skills).
Step-by-step: run the setup skill
- Open your agent's chat in the project and make sure you're in Agent mode.
- Instruct the agent to run the setup skill — literally type "run the setup skill". The setup process may take a few minutes while the agent installs the required software. As it runs, the agent will explain what it is doing and may ask for your permission before executing commands — make sure to click Accept or Approve when prompted.
- Once it's done, open the skill file yourself at
skills/setup/SKILL.mdto see how the agent was instructed. In your own projects you may consider adding a setup skill like this, to aid reproducibility of multi-step setup workflows.
Data
The data comes from Himes et al., "RNA-Seq Transcriptome Profiling Identifies CRISPLD2 as a Glucocorticoid Responsive Gene that Modulates Cytokine Function in Airway Smooth Muscle Cells." PLoS ONE. 2014 Jun 13;9(6):e99625. PMID: 24926665. It is popular in several bioinformatics tutorials, including this F1000Research workflow and this RNA-seq workshop.
The original study explored the molecular mechanisms through which dexamethasone, a glucocorticoid used in the treatment of asthma, suppresses inflammation in airway smooth muscle (ASM) cells. The study used a next-generation sequencing technique called RNA-seq to sequence eight samples: four human ASM cell lines, each measured with and without dexamethasone treatment..
We will use this data to investigate the question: "How does dexamethasone treatment change gene expression in human airway smooth muscle cells compared to untreated cells?"
Step-by-step: add the data to your project
This is the point where you would normally add your own data — either downloaded from an external source or generated from your own experiments. It is good practice to start by putting the original data files in a read-only directory, so the raw data stays untouched no matter what the analysis does to it. The data for this worked example is already in the project template, so we'll just copy it across into the data/raw/ directory.
- In your agent's chat (Agent mode), give it this prompt: "Copy the two files in
example/data/raw/intodata/raw/, then tell me what the data contains." - The agent copies
airway_counts.csvandairway_metadata.csvintodata/raw/and summarises them for you. - Open the two
.csvfiles yourself and inspect them. The values in the "count matrix" (airway_counts.csv) are the number of sequencing reads that mapped to a specific gene (row) for a specific sample (column). A higher number indicates higher transcript abundance. The metadata (airway_metadata.csv) describes the samples (e.g., which ones are treatment versus control).
airway_counts.csv
Gene activity: how many reads mapped to each gene, per sample.
| smpl1 | smpl2 | smpl3 | … | |
|---|---|---|---|---|
| gene1 | 723 | 486 | 904 | … |
| gene2 | 0 | 0 | 0 | … |
| gene3 | 467 | 523 | 616 | … |
| … | … | … | … | … |
Genes in rows (shown as gene1, gene2, … here but in practice use Ensembl IDs), samples in columns.
A note on data pre-processing
Getting to this count matrix from raw sequencing reads took several pre-processing steps that this tutorial skips. The raw sequencing reads had to be aligned to a reference transcriptome, then aggregated into the gene-level counts you see above. The tutorials I linked earlier walk through that part in full if you are interested in the details. I've left it out here to keep the focus on the downstream workflow — but in a real bioinformatics workflow, careful data pre-processing is critical, and it's certainly not a step where you want AI making the decisions for you!
Using skills: literature search
Let's start by taking a look at the existing literature. A skill turns this into a fixed procedure: the agent queries a real database through a defined script.
Step-by-step: search the literature with a skill
- In Ask mode, prompt: "What literature search skills do you have available?" Asking first, rather than jumping straight to a task, is a good habit for getting oriented with a new toolset. When I ran it, the agent found five options: literature-search-arxiv, literature-search-biorxiv, literature-search-europepmc, literature-search-openalex, and pubmed-database.
- Switch to Agent mode. This example uses pubmed-database. Prompt: "Use the pubmed-database skill to search PubMed for literature on my research question: 'How does dexamethasone treatment change gene expression in human airway smooth muscle cells compared to untreated cells?' Search combining dexamethasone, airway smooth muscle, and gene expression/transcriptome terms, and fetch abstracts for the top ~20 most relevant results. Then write a JSON file to
data/literature/sources.jsoncontaining one object per paper with these fields: pmid, title, authors, journal, pubdate, doi, abstract, and url." - The agent runs
skills/science/pubmed_database/to query PubMed, fetches the abstracts, and writes the results todata/literature/sources.json. - Open
data/literature/sources.jsonyourself and check what came back. The search may surface the original study behind this dataset (Himes et al.), but this is not guaranteed — different searches or agents may return different results. Open and read the abstract at PMID 24926665 — it names CRISPLD2 as the headline dexamethasone-responsive gene, a claim the differential expression analysis below will test directly against the data.
A note on agent behavior: The same prompt, two different reading lists
Two agents given the same question will not necessarily produce the same list. In example/data/literature/ you can compare my two runs: I did it first with GitHub Copilot (auto mode) and again with Claude Code (Opus 4.8). They took different approaches — Copilot saved all 17 results from the query it built, while Claude fetched 30 abstracts, read them, and wrote the 20 it judged most relevant. Only 7 papers overlapped between the two lists. Both runs found the single most relevant paper (the original study behind the data), but diverged considerably after that. This is worth keeping in mind when working with AI: agent behaviour differs across models and harnesses, so always check the results yourself.
Making a plan and running the analysis
This step involves creating Python scripts that execute code for statistical analysis. Here we will learn best practices of the plan-and-act approach: planning mode lets you see how the agent intends to approach the work before it generates any code files.
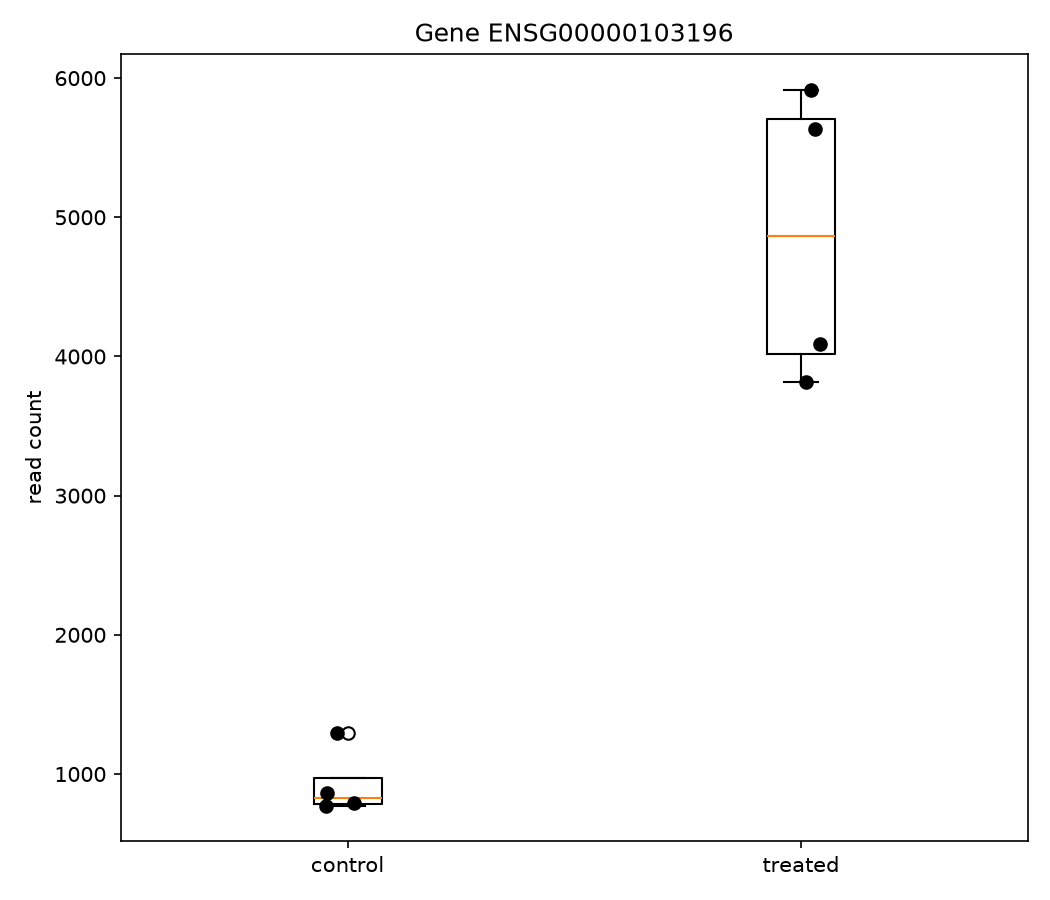
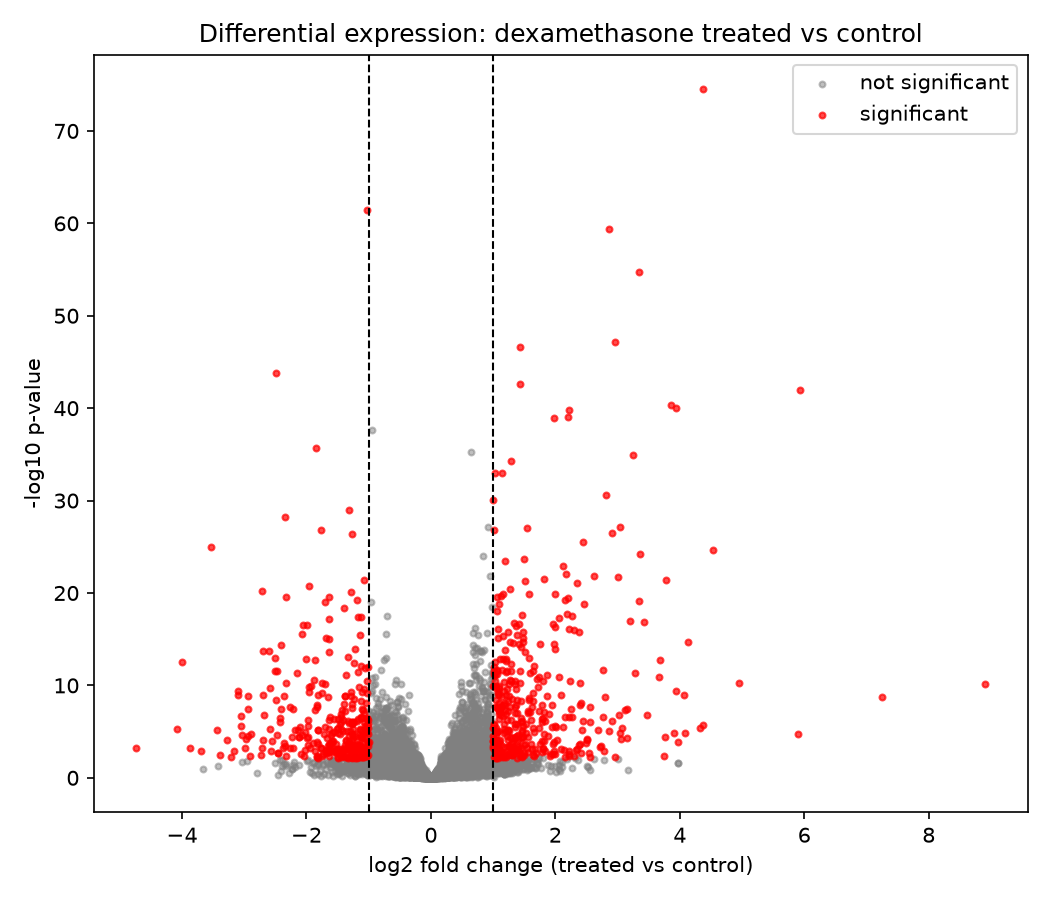
This is where we want to get to by the end of this step — using AI to help us generate the Python scripts that produce figures like these examining our data:
Step-by-step: plan the analysis before writing code
- Switch to Plan mode. In this mode the agent should not write or run any code — it can only read files and propose an approach.
- Open
example/prompts/planning_prompt.mdand look at it before you use it. Notice the requirement pointing the agent atexample/packages/PyDESeq2— a local copy of the package source code. This is a trick I use for any important package in my workflow: I download a copy of the source code of open source packages, so the agent can find what it needs faster and more reliably by reading the real code directly than by searching the web. I do this by finding the package source code on GitHub (for example, PyDESeq2) and downloading a copy into my project folder. You can use the same approach for other bioinformatics packages (e.g., Scanpy and Bioconductor packages), as well as general analysis and visualisation packages such as matplotlib for Python and ggplot2, dplyr, and tidymodels for R. - Prompt: paste the full contents of
example/prompts/planning_prompt.md. - The agent reads the two data files, thinks through a PyDESeq2 workflow, and writes an implementation plan — no code yet.
- Review the plan — don't just accept it. This is the habit worth building: read the plan before it becomes code, and check whether the agent's filled-in decisions match what you'd have chosen yourself. Look in particular for: any statistical methodology (e.g., significance threshold or data filtering approach) it picked on its own; any point where it flags an "open decision" or asks you to confirm something; and anything unfamiliar to you. If you don't recognize a statistical choice or Python package, look it up rather than trusting AI by default.
- Edit the plan file directly until it reflects choices you've made, not just ones the agent proposed. In my own run, I removed a couple of things I disagreed with, and tidied up the sections where the agent had flagged open decisions by just writing down my answer instead of leaving the question open.
- Switch to Agent mode and start the implementation by using the Start Implementation option in VS Code. Alternatively, you can paste the full contents of your edited plan into the chat or ask the agent to "implement the plan".
- The agent writes the three scripts named in the plan —
scripts/run_pydeseq.py,scripts/make_tables.py,scripts/make_figures.py. Read them once it's done. Check the critical statistical analysis steps, such as howDeseqDataSetandDeseqStatsare defined inrun_pydeseq.py. If there are parts of the code you don't understand, get AI to help explain it to you. - Prompt: "Run the three scripts in order and tell me what they produced."
- Check the results:
results/tables/de_results.csv(the full DE table),results/tables/top_genes.csv(the shortlist),results/figures/volcano.png, andresults/figures/count_plot.png. Look at the sanity-check line printed byrun_pydeseq.pyfor ENSG00000103196 (the gene that the Himes et al. paper called out) — in my run it came back with a log2 fold change of +2.63 and an adjusted p-value of ~6 × 10⁻²⁰, i.e. strongly upregulated by dexamethasone treatment.
A summary of the plan-and-act approach
There was a lot in this section, so let's recap the key tips and tricks of the plan-and-act approach to working with AI:
- Switch the agent to Plan mode — your first prompt tells it to make a plan. Use tricks like first downloading a local copy of the source code for important packages into your project directory. This is part of moving the agent from a recall and reason flow to a read and reason flow — it looks up the real code instead of guessing it, and you'll notice the benefits: fewer hallucinations and errors in the plans it produces.
- Review the plan before building. The value of Plan mode is not that the agent produces a correct plan on the first try — it's that it produces a plan you can correct before it costs you an implementation. Edit your plans until every methodological choice in it is one you'd defend yourself, not one the agent defaulted to.
- Switch to Agent mode and let it build the plan. AI agents have become remarkably capable at translating human-language instructions into working code, but that translation is only as good as the instructions themselves and agent capabilities are still very limited in highly specialised domains like bioinformatics. A clear, unambiguous, well-specified plan gives the agent less room to guess — and the less it has to guess, the more accurate the code it generates and the fewer failures you'll see in the output.
Presenting the results
We have analysis results, and now we want to present them. First we'll use two more science skills, ensembl_database and uniprot_database, to annotate the top genes found. Then we'll use Mermaid diagrams to see how AI can generate a flowchart of our workflow, making it easier to communicate our process to supervisors and collaborators. Finally, we'll see a trick for using AI to generate slides with LaTeX — I ship my own skill for this that you can take and repurpose for your own work.
Part 1: Annotate the top genes
Let's invoke more of the science skills to ground our analysis in facts for the presentation. We'll turn the anonymous Ensembl IDs in top_genes.csv into readable gene and protein information, fetched from Ensembl and UniProt.
Step-by-step: annotate the top genes
- Open
example/prompts/annotation_prompt.mdand read it before you use it. One habit worth flagging: when I build a prompt like this myself, I normally do it in several turns — first ask the agent what fields it can actually retrieve from a skill, then send a follow-up telling it how to format the results. Here it's simplified into one prompt so this example doesn't need several rounds of back-and-forth. - Prompt: paste the full contents of
example/prompts/annotation_prompt.md. - For every gene in
results/tables/top_genes.csv, plus CRISPLD2 (ENSG00000103196 — annotated separately in case it didn't make the top-gene shortlist), the agent calls theensembl_databaseskill for a gene summary, then calls theuniprot_databaseskill. It writesresults/tables/annotated_top_genes.csv(one row per gene, same order astop_genes.csv) andresults/tables/annotated_ENSG00000103196.json(the same fields for CRISPLD2 alone), each including an Ensembl and a UniProt URL. - Open both files and check what came back. Mine came back with entries such as DUSP1 (whose Biological Process terms include "response to glucocorticoid" — a sensible hit, given the treatment) and, for CRISPLD2, Molecular Function "glycosaminoglycan binding; heparin binding" and Biological Process "face morphogenesis; lung development". Click through a few of the Ensembl/UniProt links yourself — the usual "don't just trust it" habit.
Part 2: Visualise the workflow with a Mermaid diagram
This part shows how you can use AI to search your project workspace and summarise your work in a Mermaid diagram. This is useful when you need to clearly explain your methods to a supervisor or collaborator. Mermaid is a great diagramming tool for AI because it is text-based code that VS Code can render into visual charts.
Step-by-step: generate and view the diagram
- Prompt: paste the full contents of
example/prompts/mermaid_prompt.md. - The agent writes a flowchart covering the steps so far. Following the Mermaid convention in this project's
AGENTS.md, it saves the diagram inside a fencedmermaidcode block in a.mdfile —presentation/pipeline.md— so it renders in VS Code's built-in preview. - Open the
.mdfile in VS Code and preview it (Ctrl+Shift+V, orCmd+Shift+Von macOS). You can compare it against mine, rendered live below. - Then look at the file's raw source, not just the rendered preview — the fenced code block is plain Mermaid syntax (
flowchart TD, nodes, arrows, edge labels), and it's worth seeing how a few lines of text produced the diagram below. Mermaid can do more than flowcharts — sequence diagrams, class diagrams, Gantt charts, and more — so browse the Mermaid syntax examples if you want to represent something else in your own work.
example/presentation/pipeline.md, rendered:
pubmed-database skill"] STEP3["Step 3 · Plan and run the analysis
planning_prompt.md → plans/de_analysis.md
run_pydeseq.py · make_tables.py · make_figures.py"] STEP4["Step 4 · Annotate the genes
ensembl_database + uniprot_database skills
annotation_prompt.md"] DONE([Done]) RAW[/"data/raw/
airway_counts.csv
airway_metadata.csv"/] SRC[/"data/literature/
sources.json"/] OUT[/"results/tables/de_results.csv
results/tables/top_genes.csv
results/figures/volcano.png
results/figures/count_plot.png"/] ANN[/"results/tables/annotated_top_genes.csv
results/tables/annotated_ENSG00000103196.json"/] START --> STEP1 --> STEP2 --> STEP3 --> STEP4 --> DONE STEP1 -.writes.-> RAW STEP2 -.writes.-> SRC STEP3 -.writes.-> OUT STEP4 -.writes.-> ANN
Part 3: Turn your work into slides
Here's a trick I don't think many people know about (if you've tried to use AI to make PowerPoint slides, you'll know the frustration): you can use LaTeX to make slides. LaTeX is a plain-text typesetting system: you write structured markup (not unlike Markdown, but more expressive) and a compiler turns it into a formatted PDF. Because it's just text, the agent can write it, edit it, and recompile it like any other code, instead of fighting a slide-editor UI.
Ask AI "help me make slides for my project" and it will use a skill I created called make-latex-slides. It will interview you and help construct the slides.
Step-by-step: generate slides with the make-latex-slides skill
- Prompt: "Help me make slides for my project."
- The skill recognises the request and takes over with an interview asking you about the details for what to put on the slides. Just chat in natural language with the agent.
- Once you've given it your answers, it copies its bundled
.textemplate to a location you both agree on (e.g.presentation/talk.tex), fills it in, and compiles it to a PDF with Tectonic, a self-contained LaTeX engine. - A rendered PDF appears next to your
.texsource. Since it's LaTeX, if you're not happy, just make more edits to the.texwith the agent and recompile until you are. You can view mine, rendered below, or openexample/presentation/talk.texto see the source that produced it. make-latex-slidesis a skill I built, so if you find it useful feel free to customise it to your own presentation style!
Learning more about LaTeX
If you would like to learn more about how to read, write, and edit LaTeX documents, the Overleaf guide Learn LaTeX in 30 minutes is a good place to start.
9. Where to go from here
You now have a template for AI-assisted research workflows. The next step is to make it your own: either run the make-your-own skill and work with your agent to adapt the template to your project, or take the parts you find most useful and setup your own template. Once you start using it on real work, it's worth watching for a subtle risk: letting AI do so much that you stop building your own understanding of the project underneath it.
There's a term going around for this: cognitive debt — explored in the context of software engineering by computer scientist Margaret-Anne Storey (read her post), and in the context of AI-assisted writing by an MIT Media Lab study, Your Brain on ChatGPT. The same risk applies to research. An agent can produce a literature summary, a script, and a results table faster than you can read any one of them, and your own grasp of the project quietly erodes.
My advice: be selective about what you hand off to AI, and limit how much you accept at once. Passively offloading your work to AI and accepting its output as is drives cognitive debt. Steer it instead: review intermediate results and redirect as you go, and only fully delegate the kind of repetitive tasks that you already understand.
Glossary
Quick definitions for the AI jargon used throughout this tutorial:
- Agent loop
- The read → decide → act → observe cycle an agent repeats until a task is done.
AGENTS.md- A Markdown file that holds a project's context and your working preferences, for the agent to read.
- AI agent
- An assistant that works inside your IDE, combining an LLM with a harness that runs the agent loop.
- Cognitive debt
- The erosion of your own understanding of a project that results from offloading too much work to AI without reviewing it.
- Context window
- The amount of text a model can process at once. The model can only reason over what is currently inside it.
- Harness
- The software that runs the agent loop and performs actions — reading files, running commands, feeding results back in. Pairs with a model to make an agent.
- IDE (Integrated Development Environment)
- A program for writing and running code. Recommended here as the place to work with AI, so it acts on real files instead of disposable chat messages.
- LLM (large language model)
- The machine learning model inside an agent. It generates the plans and decisions from what the harness feeds it.
- Markdown
- A plain-text formatting convention (
#headings,**bold**,-bullets) that AI models read and write fluently. - MCP (Model Context Protocol)
- A protocol that lets an agent connect to a server and discover and call its tools automatically.
- Skill
- A described capability — a
SKILL.mdfile, usually paired with scripts — that an agent can invoke. - Tokens
- Roughly, pieces of words. The unit that AI usage is priced by, for both the text a model reads and the text it generates.
- Tool calling
- Connecting a model to systems you already use (search engines, databases) so it retrieves real information instead of answering from training data alone.